How To: Create Realistic Candle Effect (Part I)
Posted by
Maggie Zhang
Labels:
Advanced,
Effects,
Realistic Candle
Would you like to learn how to draw your own candle and animate it? Well, In this detailed tutorial, you will be learning how to create a very realistic candle effect in Flash and also animate it.
You might also like to see:
How To: Create Realistic Candle Effect (Part II)
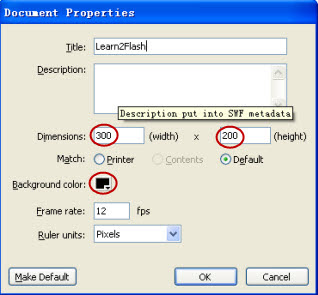
Step 1) Create a new File and adjust the properties by going to the Properties panel or by Ctrl+J. Change the size to Width: 300px Height: 200px and Background colour to Black.

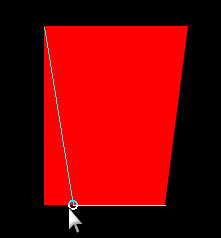
Step 2) Using the Rectangle Tool (Q) draw a rectangle with Fill Colour: Red and Stroke Colour: None. When that's done, using the Selection Tool (V), hover over the bottom left corner of the rectangle until the cursor turns into this:
and then drag the line inwards. Do the same with the bottom right corner until you get a trapezium shape.

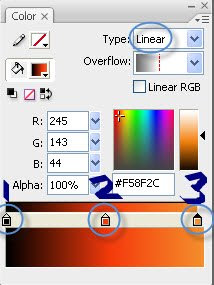
Step 3) Using the Selection Tool, Select the fill of your trapezium and open up the Colour Panel (If it's not there, go to Windows>Colours). Now select linear and input the following:
-1-Alpha 100% Colour: #000000
-2-Alpha 100% Colour: #F4390B
-3-Alpha 100% Colour: #F58F2C
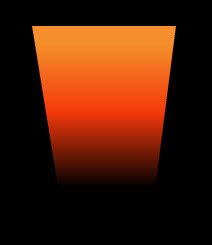
Step 4) Go to Gradient Transform (F) rotate it until it looks something like this:

Step 5) OK! Now select the oval tool and draw an eclipse shape anywhere on the canvas but not on the trapezium shape yet because that will EAT IT! Now using the selection tool, click on the eclipse and go to the colours panel and select radical:
Step 6) Select your oval again and this time you'll need to group it by pressing Ctrl+G so this way your trapezium won't be eaten.
Step 7) Your oval should now have a greenish box around it. Ok drag that so it goes ontop of the trapezium and adjust the size if you need to make it fit like so:
Step 8) Before you do anything, right click on the oval and select> Break Apart. Use your pencil tool, change the colour to dark grey with a smoothing level of 84, roughly just draw the stem of the candle in the middle. After that change the colour to red and go over the tip of that string like so:
Step 9) Isn't this so cool?! Anyways, now we have to make a new Layer above the current candle layer for the flame (Tip: Lock the Candle Layer). Use the oval tool and draw a small oval (Stroke: None Colour: Anything because we're gonna change it later). Now click on the Selection Tool (v) and adjust the shape of the oval so it's more "Flame-Like".
Step 10) Once you're done, you'll need to adjust the colour of the flame so click on it and open the colours panel. Input the following: Radical-Left: White, Alpha 0%-Right: White, Alpha 100%. Place the Flame near the stem of the candle.
Step 11) Select Gradient Transform and click on the Flame. A huge circle kind of thing will come up (If you're using Flash CS3) so just drag the circle until it is placed over the red part of the stem. Now your candle should look like this:
That's it for the first part of making a realist candle, stay tuned for the next part and i will teach you how to animate the flame. Meanwhile, you can subscribe to my blog or Fav this post if you like it!
You might also like to see:
How To: Create Realistic Candle Effect (Part II)
Subscribe to:
Post Comments (Atom)


August 26, 2008 at 12:09 AM
This is very good,to learn flash
one request is to complete the effect shown above
August 26, 2008 at 12:22 AM
Thanks, the next part of the tutorial is coming your way.
September 1, 2008 at 1:18 PM
where is gradient tranform?
September 1, 2008 at 10:27 PM
The gradient transform tool should be in your Free transform tool. Click and Hold on the free tranform tool and then you will see it. Alternatively Press F.
September 3, 2008 at 12:12 AM
nice
September 3, 2008 at 3:25 AM
Your welcome!
September 16, 2008 at 8:32 AM
thanx alot
September 17, 2008 at 9:38 AM
you are doing a great job keep it up www.nstgraphic.tk
very gud
January 21, 2009 at 5:30 AM
where is part Two???
January 21, 2009 at 6:37 PM
The Newly updated Part II of this tutorial is released!
How To: Create Realistic Candle Effect (Part II)
March 30, 2009 at 12:59 PM
Is there an easier way to shape the flame without using the selection tool?
April 3, 2009 at 12:41 AM
Hi Anonymous:
That is what I thought when i first started doing the flames but unfortunately to my understanding there is no easier way to do this, i could be wrong though, feel free to search google.
But once you get your hands on creating the flames, it doesn't seem so hard. Give it a try!
-Learn2Flash-
April 18, 2009 at 9:17 AM
wow !!! thanks a ton..!!this was really cool :D...but the flame layer is a different layer right ?? even after candle layer is created and locked..a new layer is selected , right ?
April 22, 2009 at 12:52 AM
Hi Anonymous:
You're welcome and yes create a new layer to draw you flames and lock your candle layer so that you won't accidentally select images from that layer.
October 15, 2009 at 1:16 AM
Hi
This is which i search on the net and this is very easy and amazing in a simple and stately manner thanks
Post a Comment