Flash Shortcuts
Here are most of the Flash Shortcuts, some are really useful but some you may not need to use that much. Using shortcuts in Flash will certainly save your time and effort.
File Menu
New... Ctrl+N
Open... Ctrl+O
Close Ctrl+W
Save Ctrl+S
Save As... Ctrl+Shift+S
Export Movie... Ctrl+Alt+Shift+S
Publish Settings... Ctrl+Shift+F12
Publish > Default (flash) F12
Publish Shift+F12
Exit Ctrl+Q
Edit Menu
Undo Ctrl+Z
Redo Ctrl+Y
Cut Ctrl+X
Copy Ctrl+C
Paste in Center Ctrl+V
Paste in Place Ctrl+Shift+V
Clear Backspace, Clear, Delete
Duplicate Ctrl+D
Select All Ctrl+A
Deselect All Ctrl+Shift+A
Timeline
Timeline > Cut Frames Ctrl+Alt+X
Timeline > Copy Frames Ctrl+Alt+C
Timeline > Paste Frames Ctrl+Alt+V
Timeline > Clear Frames Alt+Backspace
Timeline > Remove Frames Shift+F5
Timeline > Select All Frames Ctrl+Alt+A
View Menu
Go To > First Home
Go To > Previous Page Up
Go To > Next Page Down
Go To > Last End
Magnification
Zoom In Ctrl+=
Zoom Out Ctrl+-
Magnification > 100% Ctrl+1
Magnification > 400% Ctrl+4
Magnification > 800% Ctrl+8
Magnification > Show Frame Ctrl+2
Magnification > Show All Ctrl+3
Useful Shortcuts
Timeline > Frame F5
Convert to Symbol... F8
Break Apart Ctrl+B
Shape > Optimize... Ctrl+Alt+Shift+C
Shape > Add Shape Hint... Ctrl+Shift+H
Timeline > Distribute to Layers Ctrl+Shift+D
Timeline > Convert to Keyframes F6
Timeline > Clear Keyframe Shift+F6
Drawing Tools
Arrow V
Sub Select A
Lasso L
Line N
Pen P
Text T
Oval O
Rectangle R
Pencil Y
Brush B
Ink Bottle S
Paint Bucket K
Dropper I
Eraser E
Hand H
Magnifier M, Z
Free Transform Q
Thursday, July 31, 2008 | 0 Comments
How To: Create Glint Effect
Hello, welcome to learn2flash and today you will be learning how to make a moving glint effect on your text!!
Saturday, July 26, 2008 | 10 Comments
How To: Create Moving Clouds
In this tutorial, you will learn how to create moving clouds without any motion tweening.
Step1) Create New File> ActionScript 2
Step2) Change the Background colour to black using Properties Panel
Step3) Change the line colour to none and fill colour to white

Step4) Draw random circles using the oval tool lik e so (you don't need to be a pro at this)

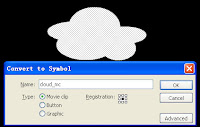
Step5) When you get a relative cloud looking shape, select (v) the whole cloud with the selection tool and go to Modify>Convert To symbol (F8) and convert your cloud into a movieclip symbol. Name your symbol 'cloud_mc' and click OK

Step6) Now you will want your cloud to look more like a cloud so select your cloud and go to Filter>Blur

Step7) Type in 20 for both X&Y and select 'Medium'

Step8) Select your cloud, right click then select actions and paste the following script into your actions box:
flagX=random(800)+50;
flagY=random(60)+10;
a=random(3)+1;
this._x=flagX;
this._y=fleagY;
speed=random(2)+0.5;
}
onClipEvent(enterFrame){
if(this._x>0){
this._x=this._x-speed;
} else{
this._x= 880;
}
}
Step9) Close the actions window and press CTRL+Enter to test your movie and you are done!! If you want to make multiple clouds, just copy and paste your current cloud and adjust the size and blur.
Friday, July 25, 2008 | 8 Comments
Flash Tutorial Videos
Friday, July 25, 2008 | 0 Comments
Contact Me
About ME
Hi, My name is Maggie and I am a highschooler who has gotten into Flash ever since I got my Animation Project. Since then I had an urge to teach others how to use Flash as well as learning from professionals. I had chosen Blogger to post tutorials about how to make certain effects on Flash and hope people really learn something from reading my posts.
You can e-mail me if you have any comments, questions or suggestions to at.blackmaii23@gmail.com
or use the form below and send me an e-mail.
Friday, July 25, 2008 | 0 Comments
How To: Create Snowing Effect
In this tutorial, you will learn about making the snow effect using complete Actionscript 2.0 code.
Step1) File>New Flash FIle (AS2)

Step2) Change the background colour to black (or other darker colours) using the properties panel. There is no need to change the canvas size or frame rate unless you want to.

Step3) Right click on first frame on layer 1 (or F9) to bring up the Actions page.

Step4) Click on the following link and copy the code:
Snow Effect Code
Step5) Close the Actions page and press CTRL+ENTER to test your falling snowflakes!!
Friday, July 25, 2008 | 0 Comments


