Cylindrical Text Effect
Hot pile of Flash tutorials coming through! This time we will learn an easy text effect which is simple (but fascinating), popular (but cool).
The Final Result:
Step 1) Create a New File with any dimensions to your likings. (P.S. There will be no Action Script work and therefor this effect can be done on any versions of the later Flash softwares.)
Step 2) Go to Insert-Symbol (Ctrl+F8). Name the new symbol anything you like but I have name mine text (so original eh?) and then check the Graphic box.
Step 3) You will enter and blank stage where you will type in your desired text like so. You may also wish to customize the text around to create your own originality.
Step 4) Now that you have finished with creating your text, click on Scene 1 to get back to your main scene.
Step 5) Open up your library (Ctrl+L) and drag the Graphic symbol you just created onto the stage. Then, in the 15th frame or so (can be adjusted to you own liking of how fast the text should spin) add a Keyframe (F6).
Step 6) Go back to Frame 1 and with the Graphic still selected, press on the Free Transform Tool (Q)
Step 7) Move the white dot in the middle to the top like so:
Step 8) Adjust the Graphics's Alpha to 5%.
Step 9) Then reduce the image's height only until so:
Step 10) In between the 1st and 15th frame, right click - Create Motion Tween
Step 11) Create a New Layer and repeat the same steps from 5~10. However it's been reverse so that Frame 1 would have Alpha of 100% whereas Frame 15 will have Alpha of 5%.
Important Note: When dragging the Graphic onto your 2nd layer, it should overlap exactly on top of where the Graphic (text) of layer one in the 15th frame was. To do this, select the Graphic and move it using the arrows on your keyboard.
To see if you're following this tutorial correctly, please see the following images:
This should be how Frame 1 should look like with the visible text and the invisible text slightly above it. (They are placed in different layers)
This should be how Frame 15 (or 16 in my case) should look like with the invisible text below the normal text. The extra empty frames at the end is optional if you want the text to stop for a while before tuning again.
Enjoy your holidays!~
Friday, January 02, 2009 | 11 Comments
Flash: Alpha Mask Effect
Happy New Years everyone! I am finally back after a long year of school work. Now let's kick off the new start of Learn2Flash with an easy image effect tutorial.
The Final Result:
Step 1) Open up a new Flash File (ActionScript 2.0) and click on - Modify - Document to adjust the Height:307 Width: 404.
Step 3) Go to Modify - Convert to Symbol (F8) and convert it into a MovieClip. Once that's done in the Instance Name field enter "pic" as shown below and also tick the box "Use runtime bitmap catching".
Step 4) Still on your picture layer, click on the 15th frame and press F5 or right-click, Insert Frame.
Step 5) Create a new layer above your picture and draw a small oval in the center (Stroke: None, Fill: Black). Select the oval and press F8 to make this a MovieClip Symbol.
Step 6) Select your oval and in the Instance Name field enter: mask_mc.(This is an important step as it will be used in our ActionScript).
Step 7) Go to Filter and add Blur to your oval at Blur X: 100, Blur Y: 100.
Step 8) In frame 15 of your oval, press F6 to Insert a Key Frame (Right Click, Insert Keyframe) and in the 15th frame use the Free Transform Tool (Q) to click and drag your oval to become bigger (but smaller than your actual picture).
Step 9) Right click in anywhere between the 1st and the 15th frame and click on Create Motion Tween.
Step 10) Create a new layer and this is where the AS code will be inserted. On the first frame press F9 to insert the AS code link .
Step 11) Go to the 15th frame and create a Keyframe (F6) and insert this code if you do not wish the Flash to replay.
Finished and Enjoy your holidays!
Wednesday, December 31, 2008 | 14 Comments
Cool Chrome Text Effect
Hello everybody! To celebrate Learn2Flash nearly hitting 8000 view hits, I'll kick off the celebration with this Chrome Text Effect Tutorial! Enjoy your time learning how to create a cool chrome effect!
Step 1) Go to New File and change the properties of the canvas. Width: 500px Height: 400px. Background Colour: #003399
Step 2) Now click on your Text Tool (T) and change the properties in the properties panel. Font: Arial Black, Size:66, Colour: #3399FF (Of course you can change the properties to your likings to create your own unique style of text). Click on the canvas and type in your desired words.
Step 3) Select the text and >Right Click>Break Apart (Ctrl+B) twice to break the text into it's raw form.
Step 4) Click anywhere on the canvas to deselect the text. Now select the Ink Bottle Tool (S). In the properties panel, change the stroke setting to Black and Solid with a thickness of 4 and then using the Ink Bottle Tool click on each individual text to make an outline.
Step 5) Using the Selection Tool (V), carefully select only the blue part of the text avoiding the outing. Just click on one blue part and hold down Shift to select another part. After that is done, press F8 to convert that into a Graphic.
Step 6) Press delete on your keyboard to delete that graphic you just made and you'll be left with only the outline of your text.
Step 7) Now select all of that outline by using the Selection Tool (V) or just use the short cut (Ctrl+A).
Step 8) While the text are still selected, use the Paint Bucket Tool (K) and in the Colour Panel (Shift+F9) change the Stroke to Linear with colour Black and White. You'll notice the outline colour now goes from black on the left to white on the right. We don't want that so go to the Gradient Transform Tool (F) and rotate the gradient until it is parallel. Play around with the gradient until you get this effect:
Step 9) Press Ctrl+A to select everything and go to Modify>Shapes>Convert Lines to Fills.
Step 10) Press Ctrl+A again to select all the fills and got to Modify>Convert to Symbol (F8). Select Graphic and name it "Border".
Step 11) Open up your library (Ctrl+L) and double click into that blue chrome fill we deleted a while ago. With the blue parts selected, open up the colour mixer and change the fill to linear. Add 5 colour swatches in. From left to right the colours are : #CCCCCC, #FFFFFF, #999999, #CCCCCC, #FFFFFF.
Step 12) Select all the text and use the Gradient Transform Tool (F). Rotate the gradient so it is parallel (horizontally) like so. Adjust the gradient a bit until you feel like it has a chrome look.
Step 13) Ok great! Now go back to your main scene:
and now you can drag your Chrome from the library to the stage, align it with the border by using the arrow keys to move it around and change the background colour so you can get a better look at the border. Tip: Move the chrome a bit away from the border until you achieve a professional looking 3D kind of effect!
Done! Thanks for coming and don't forget to Subscribe to my Blog if you want the latest Buzz in Learn2Flash and you are welcome to Fav this post if you like it!
Saturday, August 30, 2008 | 9 Comments
How To: Create a Shadow
Any animation or drawing is unrealistic if it doesn't have a shadow. They will all look unnatural to the eye. In this simple tutorial, you'll learn the easiest way to create your own character's corresponding shadow!
Step 1) I will now assume that you already have your own character drawn out ready to go if not just draw a simple one now! I have used the following character i drew for my animation project. And as you can see it's abit unnatural without a shadow. (P.S you don't have to have a background like mine, you can just put a simple green or blue background, but not black)


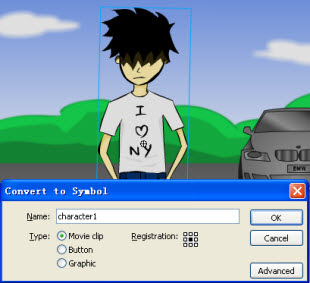
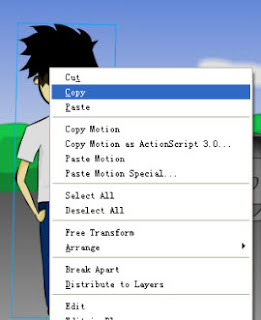
Step 3) Ok, now your character is a symbol so you can jsut right click and press copy and then paste it on a differnt layer below your current character layer.
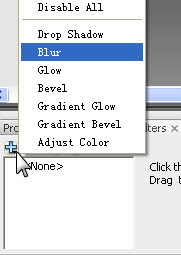
Step 4) Now select your character's copy and change the following properties in the properties panel.
Step 6) You can input the following into the X and Y values (You don't have to be exactly like mine but something similar or you think that suits your character will do)
Step 7) Now choose the Free Transform Tool (Q) and make your character copy abit smaller than your original character because that'll be the shadow. You can also rotate it if the light if coming from a different direction.
Step 8) Once you have adjusted the size to your likings, just drag or use the arrow keys to move the shadow near your character's foot like below:
And Now your done! What's Next? Support this post by social bookmarking it.
Friday, August 22, 2008 | 4 Comments
How To: Add Flash to your Blogger
Do you want to create your Blog posts more intersting to read?
Do you want to attract the attention of your viewers immediately?
If your answer is YES to one of them then you've come to the right place. By placing a Flash (swf file) you made yourself in posts shows off your professional skills and attracts your readers to continue reading about what your have to say.
Before you begin, make sure you have a Image Host or Swf file hosts which allow you to upload your swf files onto the web. I, myself am using Google Page Creators but recently they have closed new member registration to concentrate on working on Google Sites.
Step1) Open up Creating a New Post, click on the link below and copy & paste the following code (in Edit Html Mode)to where ever you want to display your Flash.
ADD FLASH TO YOUR SITE LINK
Step2) Once you have finished uploading your swf (Flash file) onto the web, you will need to copy the link to your animation and replace YOUR FLASH LINK HERE with the link you get.
Step3) Nearly done! Now you just need to change the height="101" width="400" to the
dimensions of your Flash.
Friday, August 08, 2008 | 15 Comments
Flash Shortcuts
Here are most of the Flash Shortcuts, some are really useful but some you may not need to use that much. Using shortcuts in Flash will certainly save your time and effort.
File Menu
New... Ctrl+N
Open... Ctrl+O
Close Ctrl+W
Save Ctrl+S
Save As... Ctrl+Shift+S
Export Movie... Ctrl+Alt+Shift+S
Publish Settings... Ctrl+Shift+F12
Publish > Default (flash) F12
Publish Shift+F12
Exit Ctrl+Q
Edit Menu
Undo Ctrl+Z
Redo Ctrl+Y
Cut Ctrl+X
Copy Ctrl+C
Paste in Center Ctrl+V
Paste in Place Ctrl+Shift+V
Clear Backspace, Clear, Delete
Duplicate Ctrl+D
Select All Ctrl+A
Deselect All Ctrl+Shift+A
Timeline
Timeline > Cut Frames Ctrl+Alt+X
Timeline > Copy Frames Ctrl+Alt+C
Timeline > Paste Frames Ctrl+Alt+V
Timeline > Clear Frames Alt+Backspace
Timeline > Remove Frames Shift+F5
Timeline > Select All Frames Ctrl+Alt+A
View Menu
Go To > First Home
Go To > Previous Page Up
Go To > Next Page Down
Go To > Last End
Magnification
Zoom In Ctrl+=
Zoom Out Ctrl+-
Magnification > 100% Ctrl+1
Magnification > 400% Ctrl+4
Magnification > 800% Ctrl+8
Magnification > Show Frame Ctrl+2
Magnification > Show All Ctrl+3
Useful Shortcuts
Timeline > Frame F5
Convert to Symbol... F8
Break Apart Ctrl+B
Shape > Optimize... Ctrl+Alt+Shift+C
Shape > Add Shape Hint... Ctrl+Shift+H
Timeline > Distribute to Layers Ctrl+Shift+D
Timeline > Convert to Keyframes F6
Timeline > Clear Keyframe Shift+F6
Drawing Tools
Arrow V
Sub Select A
Lasso L
Line N
Pen P
Text T
Oval O
Rectangle R
Pencil Y
Brush B
Ink Bottle S
Paint Bucket K
Dropper I
Eraser E
Hand H
Magnifier M, Z
Free Transform Q
Thursday, July 31, 2008 | 0 Comments
Flash Tutorial Videos
Friday, July 25, 2008 | 0 Comments


