
Showing posts with label Advanced. Show all posts
Showing posts with label Advanced. Show all posts
Animation: Beijing Olympics Scroll
Labels:
2008 Beijing Olympics,
Advanced,
Effects,
Imitation,
Motion Tween,
Opening Ceremony,
Scroll Opening
I believe everyone would've seen the Beijing Olympics Opening Ceremony where a scroll opens to display thousands of years of Chinese history. Today we will create a simple animation imitation of the "Scroll Opening".
The Final Effect:
Step 1) Create a Default Flash document e.g. width 550, height 400. Using the rectangle tool (R) to draw a rectangle, Stroke Height is 2 and the Fill Colour is #BED0BF.

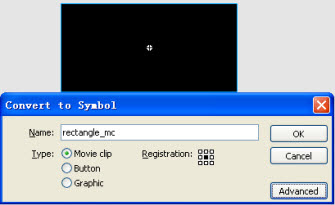
Step 2) Select the rectangle you just created along with the border and convert it into a Movie Clip Symbol.
Step 3) Ctrl+R and import a picture which you like to the stage. Right-click on the green rectangle and click on Arrange -- Send to Back.

Step 4) Using the Free Transform tool, adjust the size of your picture to an appropriate size and align it to the center of the green rectangle.

Step 5) Go to Insert New Symbol (Ctrl+F8) and when you come into a blank stage, draw a black rectangle using the Rectangle Tool with Stroke: None, Fill: Black. Now exit the symbol and back onto Scene 1 by clicking on the tab as shown in the image below.

Step 6) Drag the black rectangle from the library and onto the stage. Right-Click on the image -- Arrange -- Send Backward.

Step 7) Using Free Transform (Q), adjust the width and height of the black rectangle until it looks like a border around your picture. (P.S Turn Snap to Objects off)


Step 9) Use the Rectangle tool again and draw a black rectangle.

Step 10) Select (V) the whole green bar and using the arrow keys, move the green bar over the top of the black rectangle.

Step 11) Using the selection tool (V), make the two ends of the black rectangle into curves.

Step 12) Exit the Symbol and onto your Scene 1, drag the scroll bar from your library and onto the stage. Copy and Paste the Scroll bar and move them to the left hand side of the picture.

Step 13) Right-click on your scroll bars and Distribute to Layers.

Step 14) You will end up with 3 layers, the bar on the right is on the top layer, the bar on the left is on the 2nd layer and the picture is on the bottom layer.

Step 15) Create a New Movie Clip Symbol called "White Square". Using the Rectangle Tool (R), draw a rectangle that is enough to cover the picture on the bottom layer, Stroke: None, Colour: White.
Step 16) Exit and click on the Layer "Right bar". Drag the white square symbol from the library and onto the stage covering the bottom picture. Right click on the white square, Arrange -- Send Backward.

Step 17) Press down Shift and click on the Right bar and the white square. While the two are selected, press Ctrl+G to group them together.

Step 18) Go to Frame 100 and press F5 to all the three layers to create new frames.

Step 19) Select the top layer (Right Bar) and go back to frame 50 and press F6 to create a Key Frame. Still on frame 50, move the right bar and the white square which you have just grouped to the right until the picture on the bottom layer shows fully. Right click anywhere between Frame 1~50 and select Motion Tween.

You have now completed the wanna be Olympic Scroll. Enjoy and don't forget to subscribe to leave a comment about how you think it went. Don't hesitate to ask questions!
Flash: Earthquake Effect
Labels:
Actionscript 2.0,
Advanced,
Effects,
Image Effect
Happy New Years everyone! The NEW release of the Earthquake Effect Tutorial celebrates the success of the Learn2Flash Blog with 40+ subscribers and a near 50000 visits. Thank you to every one of the readers of this Blog and I hope you can enjoy this tutorial.
The Final Effect:
Step 1) You will need an earthquake image. Just simply browse through Google or select any image to your likings.
Step 2) Now create a New File (ActionScript 2.0)
Step 3) Document Properties - Background: Black, Frame Rate: 15, the Width and Height of the document should be set as the same size as the image you're about to import.
Step 4) Import your image into your Library (File-Import-Import To Library).
Step 5) Drag your image to the stage and Align it to the stage. (To Open the Align Panel, press Ctrl+K)

Step 6) Select your image and convert it into a Movie Clip symbol by Modify-Convert to Symbol (F8). Name the symbol mc and set the Registration to Top Left.
Step 7) Select your image again and in the properties area, type in mc in the Instance Name box. (This step is essential for the Actionscript to work)

Step 8) Click on the empty spaces in the Document (not the image) and when the Document Properties shows up, click on Settings. This is mainly because the code we're about to use is only application in older versions of Flash.

Step 9) This will bring up a pop-up window. Click on versions (In my case it says Flash 9) and in the drop down list, select Flash 6.

Step 10) In the layer you're on now, go to Frame 2 and press F5 to create a new frame.
Step 11) Create a New layer above it which is going to be our actionscript layer. In Frame 2 of this Layer press F6 to create a Keyframe.
At this point, it should look like this:

Step 12) In the 1st frame of the Earthquake layer, copy and paste this CODE . In the 2nd frame, copy and paste this CODE . (To open the actions box, select the layer and press F9 or right-click on frame--Actions)
Clicking on the above links will lead to my GooglePages where i have uploaded the Codes for this effect to work.
Ctrl+Enter to test the final effect and you're done! If you have any problems, please do not hesitate to comment below, I will do my best to answer all questions. And of course complimentary comments are most welcomed.
Meanwhile Subscribe to Learn2Flash to get the Latest Updates and New Releases for Tutorials, it will only take you 30 seconds or so.
How To: Create Realistic Candle Effect (Part I)
Labels:
Advanced,
Effects,
Realistic Candle
Would you like to learn how to draw your own candle and animate it? Well, In this detailed tutorial, you will be learning how to create a very realistic candle effect in Flash and also animate it.
You might also like to see:
How To: Create Realistic Candle Effect (Part II)
Step 1) Create a new File and adjust the properties by going to the Properties panel or by Ctrl+J. Change the size to Width: 300px Height: 200px and Background colour to Black.

Step 2) Using the Rectangle Tool (Q) draw a rectangle with Fill Colour: Red and Stroke Colour: None. When that's done, using the Selection Tool (V), hover over the bottom left corner of the rectangle until the cursor turns into this:

and then drag the line inwards. Do the same with the bottom right corner until you get a trapezium shape.

Step 3) Using the Selection Tool, Select the fill of your trapezium and open up the Colour Panel (If it's not there, go to Windows>Colours). Now select linear and input the following:

-2-Alpha 100% Colour: #F4390B
-3-Alpha 100% Colour: #F58F2C
Step 4) Go to Gradient Transform (F) rotate it until it looks something like this:
Step 5) OK! Now select the oval tool and draw an eclipse shape anywhere on the canvas but not on the trapezium shape yet because that will EAT IT! Now using the selection tool, click on the eclipse and go to the colours panel and select radical:

Step 6) Select your oval again and this time you'll need to group it by pressing Ctrl+G so this way your trapezium won't be eaten.
Step 7) Your oval should now have a greenish box around it. Ok drag that so it goes ontop of the trapezium and adjust the size if you need to make it fit like so:

Step 8) Before you do anything, right click on the oval and select> Break Apart. Use your pencil tool, change the colour to dark grey with a smoothing level of 84, roughly just draw the stem of the candle in the middle. After that change the colour to red and go over the tip of that string like so:

Step 9) Isn't this so cool?! Anyways, now we have to make a new Layer above the current candle layer for the flame (Tip: Lock the Candle Layer). Use the oval tool and draw a small oval (Stroke: None Colour: Anything because we're gonna change it later). Now click on the Selection Tool (v) and adjust the shape of the oval so it's more "Flame-Like".
Step 10) Once you're done, you'll need to adjust the colour of the flame so click on it and open the colours panel. Input the following: Radical-Left: White, Alpha 0%-Right: White, Alpha 100%. Place the Flame near the stem of the candle.

Step 11) Select Gradient Transform and click on the Flame. A huge circle kind of thing will come up (If you're using Flash CS3) so just drag the circle until it is placed over the red part of the stem. Now your candle should look like this:

That's it for the first part of making a realist candle, stay tuned for the next part and i will teach you how to animate the flame. Meanwhile, you can subscribe to my blog or Fav this post if you like it!
You might also like to see:
How To: Create Realistic Candle Effect (Part II)
How To: Create Heartpulse Effect
Labels:
Advanced,
Effects,
Heartpulse,
Motion Tween
This is a simple tutorial to help you make a heartpulse effect such as the ones you may see in an animation or real life.


Step1) Create a New File. Change the dimensions to Width: 200px Height: 100px and change the background to black and press OK.

Step2) Now choose the Line Tool (N) and change the colour of the stroke to #00CC00 and the fill colour to none.

Step3) Now i believe all of you have seen a heartpulse so just imagine the lines and draw it down, as a result your heartpulse would look something like this.

Step4) Now go up and create another layer one top of the heartpulse layer called 'rectangle' and lock the 'heartpulse' layer.

Step5) In your new rectangle layer draw a black rectangle (no stroke colour) using the rectangle tool that will cover your entire canvas and then convert the whole rectangle into a Movie Clip symbol by Modify>Convert to Symbol (F8)

Step6) Still in your rectangle layer, create a Key Frame (F6) on Frame 40, 41, and 80 (right click Insert Key Frame or F6). Go back to your 'heartpulse' layer and create a key frame at frame 80.

Step7) Go to the rectangle layer, on frame 40 select your rectangle and by using the arrow keys, move the rectangle to the right hand side of your heartpulse.

Step8) On frame 41, move the rectangle to the left hand side of your heartpulse

Step9) Motion Tween the frames between 1~40 by right clicking on any frame between them and select Motion Tween. Do the same for Frames 41~80.
Ctrl+Enter to Test your movie! Hope you have enjoyed the tutorial!
How To: Create Old Film Effect
Labels:
Actionscript 2.0,
Advanced,
Effects,
Old Film Effect
The old film effect has now become popular for Flash artists to put in their animation as a Flash back to past memories or pretending to watch an old film. Either way, this tutorial will teach you how to create this effect to put for your animation or as a image effect.
Step1) Create New File (Note: Actionscript 2.0 only) and change the properties shown in the image below:
Step1) Create New File (Note: Actionscript 2.0 only) and change the properties shown in the image below:

Step2) Copy and Import the following Tom and Jerry picture if you like or get your own picture which is about 300px by 225 px. (It will be best if you get a black and white picture or an image from an old film)

Step3) Ok, after you have imported the picture to the library by: File>Import>Import to Library, you will need to create an empty movie clip by: Insert>New Symbol (Ctrl+F8). Name it anything you like and press Enter.
Step4) Now you will be inside your symbol (AHH it's all black!!) but dont worry, just drag the Tom and Jerry (or the picture you've imported into the library) to the stage. (Note: If the Library Panel is not opened, simply go to Windows>Library (Ctrl+L).

Step5) Select your image and adjust the size and position of your image by inputting the following into your properties panel: (PS the width and height does not have to be exactly the same but something close would be fine)

Step6) Go back to scene one by clicking on it at the top:

Step7) Once you are at scene1, drag the movie clip you were just in from the library to the stage. Then you will need to centre the image by using the Align Panel. Windows>Align (Ctrl+K)
Click you image and align it to the centre of the stage:

Step8) Now right click on your image and select Actions (F9) to open up an actions panel and copy and paste the folowing code:
onClipEvent (enterFrame) {
this._x = Math.random()*2+90;
this._y = Math.random()*2+60;
this._alpha = Math.random()*30+50;
}
this._x = Math.random()*2+90;
this._y = Math.random()*2+60;
this._alpha = Math.random()*30+50;
}
Now you're done!! Test your movie now!!
How To: Create Rain Effect
Labels:
Actionscript 2.0,
Advanced,
Effects,
Rain Effect
In this simple but detailed tutorial, you will learn how to create rain effect using actionscript which can be used in your animation.
Step1) Create a new file (Note: It has to be Actionscript 2.0 or else you will get errors), then using the properties panel change the background to BLACK.
Step2) Now go to Insert>New Symbol

Step3) Name it circleclip and the type is Movieclip and click on Advanced and tick Export for Actionscrip and hit OK.

Step4) Now you should be inside the circleclip symbol. Now select the rectangle tool and for the stroke colour select none (the box with a diagonal line through it).
Step5) For the fill colour, open up a colour panel by Windows>Color or Shift+F9 then click on type and select Radical.

Step6) Using the rectangle tool draw a rectangle of any size because we can adjust it later.
Step7) Now select your rectangle and click on Gradient Transform (F), drag the gradient tranform tool until it looks like the image below.
After that your rectangle should look like this:

Step8) Now you may think your rectangle is abit big for a raindrop and it is..so click on your raindrop image you just made and in the properties panel, input the following measurements:

Step9) Ok nearly finished! Now we go back to scene 1 by clicking 

Step10) Click on the first frame and Right Click> Actionscript or press F9 to get the actionscript panel up. Click the following link and copy and paste the code into your actions box:
Step11) This step is optional but you can change the speed and amount of rain drops you want by simply changing the values

Subscribe to:
Posts (Atom)